
An iron condor strategy is a four-leg, defined-risk options strategy that combines a short call spread and a short put spread on the same underlying asset and expiration date. We teach this strategy to traders who want to collect premium when they expect a stock or index to trade within a specific range through expiration. Because all four legs are opened simultaneously, both the maximum profit and maximum loss are known before you ever place the trade.
You've probably seen traders post an iron condor payoff chart showing a flat profit zone between two short strikes and sharp loss lines beyond the wings. That shape is the entire point of the trade. By the end of this guide, you'll understand how to construct the four legs, how volatility skew affects strike selection, how the Greeks behave as expiration approaches, and how experienced traders adjust the position when price challenges a short strike.
This guide is written for traders who already understand single-leg options and vertical spreads. We're going to move past the basic definition quickly and spend most of our time on strike selection logic, Greek interplay, and the adjustment decisions that separate a disciplined iron condor strategy from a losing one.
How Do You Construct an Iron Condor?
Bottom Line: An iron condor strategy profits from a stock or index staying within a defined range, with both max profit and max loss fixed at entry. The real edge comes from disciplined strike selection around volatility skew and knowing when and how to adjust a tested short strike rather than holding the position blindly to expiration.
An iron condor is built from four separate option contracts, all expiring on the same date, all on the same underlying.
The Four Legs
- Sell an out-of-the-money (OTM) put closer to the current price
- Buy a further OTM put at a lower strike, for protection
- Sell an OTM call closer to the current price
- Buy a further OTM call at a higher strike, for protection
The two short options generate the premium you collect. The two long options define your risk by capping how far the position can move against you. This is what makes the iron condor a defined-risk, credit-collecting strategy rather than an undefined-risk one like a naked strangle.
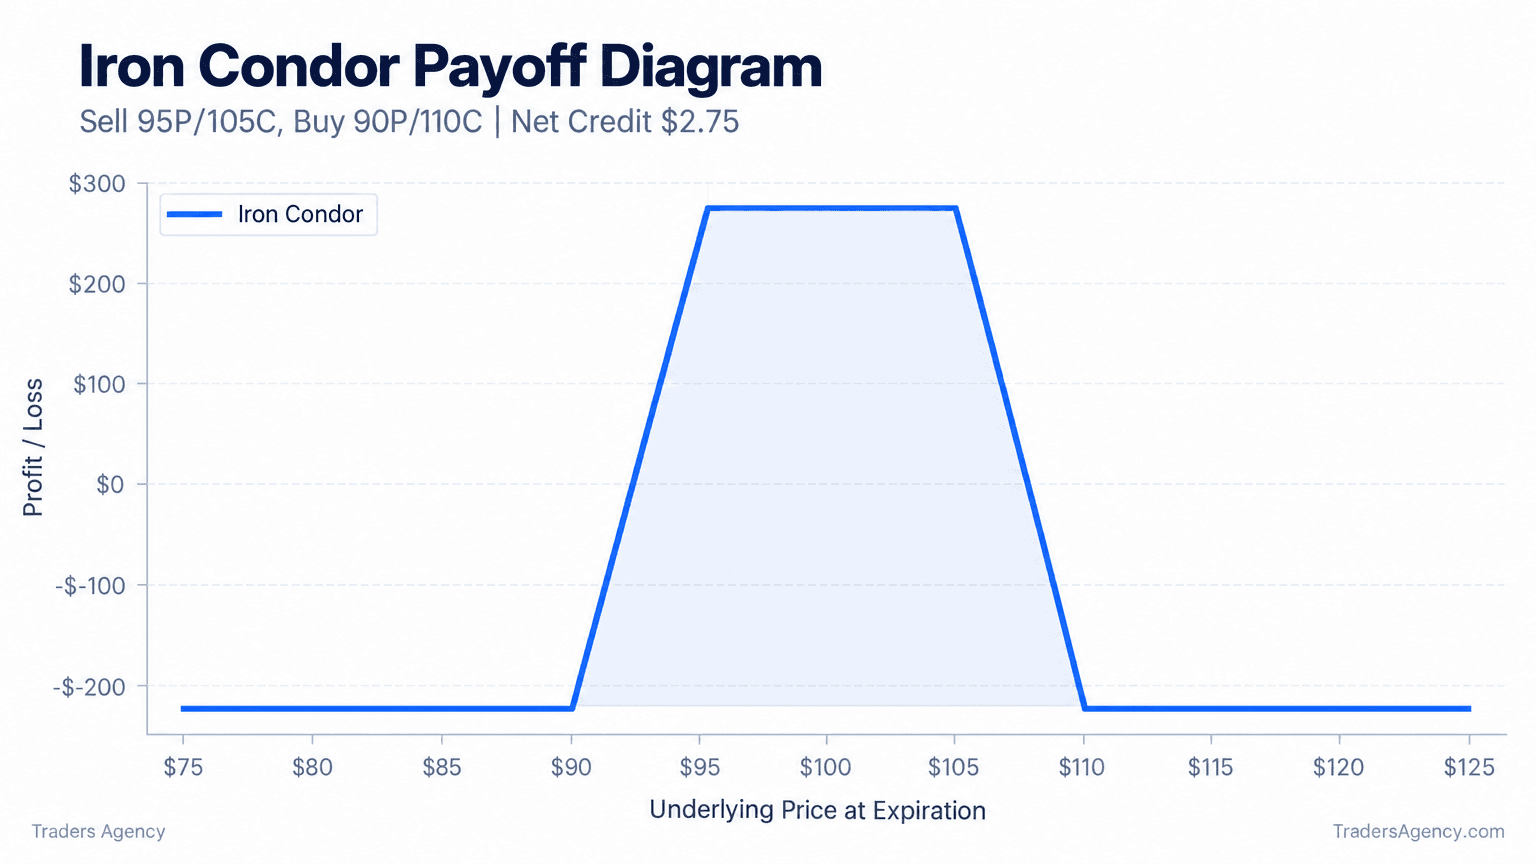
Picture a stock trading at $100. We might sell the 95 put and buy the 90 put for protection, then sell the 105 call and buy the 110 call for protection. That's the full structure: short 95/90 put spread, short 105/110 call spread, same expiration.
What Is the Profit/Loss Diagram of an Iron Condor?
The profit/loss diagram of an iron condor shows a flat, maximum-profit plateau between the two short strikes, sloped transition zones toward each breakeven point, and flat maximum-loss lines beyond the long strikes. It's the signature shape we reference whenever we teach this strategy.
Using the example above, here's how the numbers work out:
| Metric | Value |
|---|---|
| Net credit received | $1.80 per share ($180 per contract) |
| Max profit | $180, if stock closes between $95 and $105 at expiration |
| Upper breakeven | $106.80 ($105 short call strike + $1.80 credit) |
| Lower breakeven | $93.20 ($95 short put strike - $1.80 credit) |
| Max loss | $320 per contract ($5 spread width - $1.80 credit, x100 shares) |
Notice that the max loss on each side is capped at the strike width minus the credit received, not an unlimited amount. That cap is the defining feature that separates an iron condor strategy from a short strangle, where losses are theoretically open-ended. If you want to model this without doing the arithmetic by hand, many trading platforms offer an iron condor calculator that lets you plug in strikes and premiums to see breakevens and max loss instantly.
Key Concept: An iron condor's max loss is the width of the tested spread minus the credit collected, which is identical on both sides when the two wings are the same width. That number is fixed the moment you open the trade, which is what makes this a defined-risk strategy.
What Is the Objective of an Iron Condor in a Range-Bound Market?
We build the iron condor strategy specifically for markets we expect to stay inside a defined price band through expiration. You're not betting on direction. You're betting on containment.
This is why implied volatility matters more than price direction when we're scanning for candidates. A stock with elevated implied volatility that we believe is overstated gives us richer premium on both sides of the condor, which widens our breakevens and improves our odds of staying profitable. A stock in a tight, low-volume consolidation with low implied volatility usually isn't worth the trade, because the credit collected won't justify the risk.
Traders new to this strategy often make the mistake of applying it to earnings season single stocks, where a surprise move can blow through both wings in a single session. We prefer to deploy this strategy on broad index products or large, liquid names where overnight gaps are statistically less violent.
Institutional Volatility Skew and Strike Selection
Professional desks don't pick iron condor strikes symmetrically around the current price. They price strikes off the volatility skew, which reflects the market's tendency to price downside puts richer than equidistant upside calls.
This skew exists because institutional hedgers are persistent buyers of downside protection, which pushes implied volatility higher on the put wing relative to the call wing. If you build your condor using equal-delta strikes rather than equal-distance strikes, you'll often find your put spread sits farther from the current price than your call spread, simply because the richer downside implied volatility pushes a given delta out to a more distant strike.
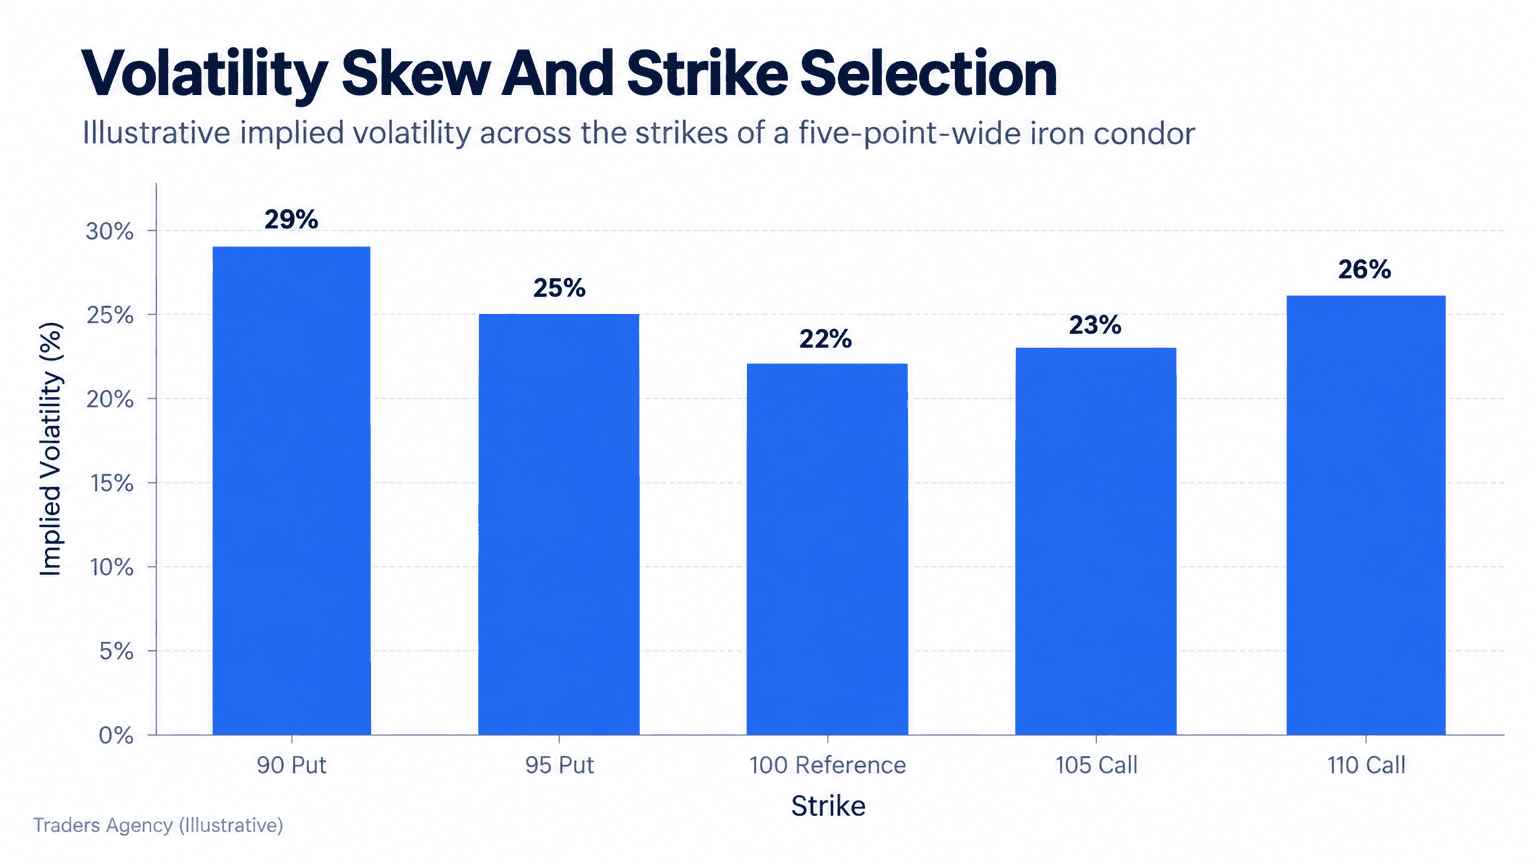
We teach a delta-based approach to strike selection rather than a fixed dollar distance. Selling the put and call near the 16-delta level is a common starting point, since it roughly corresponds to a one standard deviation move and gives a statistically grounded probability of expiring out of the money. The Cboe publishes educational material on how delta approximates probability of expiration in the money, which is worth reviewing if you want the full statistical basis.
Want expert trading insights delivered daily?
Join thousands of traders who rely on Traders Agency for market analysis and trade ideas.
Join Traders AgencyA Hypothetical Iron Condor Trade With Advanced Adjustments
Let's walk through a full iron condor example with an adjustment built in, since static examples rarely reflect how these trades actually play out.
Step-by-Step: Running This Trade
- Step 1: Open the Position. We open a 45-day iron condor on an index trading at $450, selling the 440 put / buying the 430 put, and selling the 460 call / buying the 470 call, for a net credit of $2.40 ($240 per contract).
- Step 2: Watch for the Adjustment Trigger. At day 20, the index rallies to $458, pressing against the short call strike and pulling delta sharply higher on the call side.
- Step 3: Roll the Tested Side. Rather than letting the short call push into the money, we roll the entire call spread up and out, closing the 460/470 call spread and reopening a 470/480 call spread in the next monthly expiration for an additional $0.60 credit.
- Step 4: Manage to the Outcome. From here, we let the trade play out toward one of three scenarios below, closing early for a profit if conditions allow.
| Scenario | Index Behavior Into Expiration | Outcome |
|---|---|---|
| Best Case | Settles back under $470 | Both spreads expire worthless; keep the full adjusted credit of $3.00 ($2.40 original credit + $0.60 roll credit) |
| Most Likely Case | Drifts sideways in the high $440s to low $460s | Close early for a partial profit once 50% of max profit is captured |
| Worst Case | Continues rallying past $480 | Rolled call spread is fully breached; loss capped at the new $10 spread width minus the total credit collected across the original trade and the roll |
This kind of active management is exactly what separates a mechanical checklist approach from how we actually run these positions in live accounts.
How Do Delta, Theta, and Vega Affect an Iron Condor?
At trade entry, an iron condor is designed to be roughly delta-neutral, meaning it has little directional bias. As the underlying moves toward one short strike, delta shifts meaningfully in that direction, which is your early warning signal that an adjustment may be needed.
Theta is the engine of the trade. Because you're net short options, time decay works in your favor every day the position sits inside the profit zone, and theta decay accelerates in the final two to three weeks before expiration.
Vega works against you if implied volatility rises after you open the trade, even if price hasn't moved, because higher volatility increases the value of all four options and widens the range of probable outcomes.
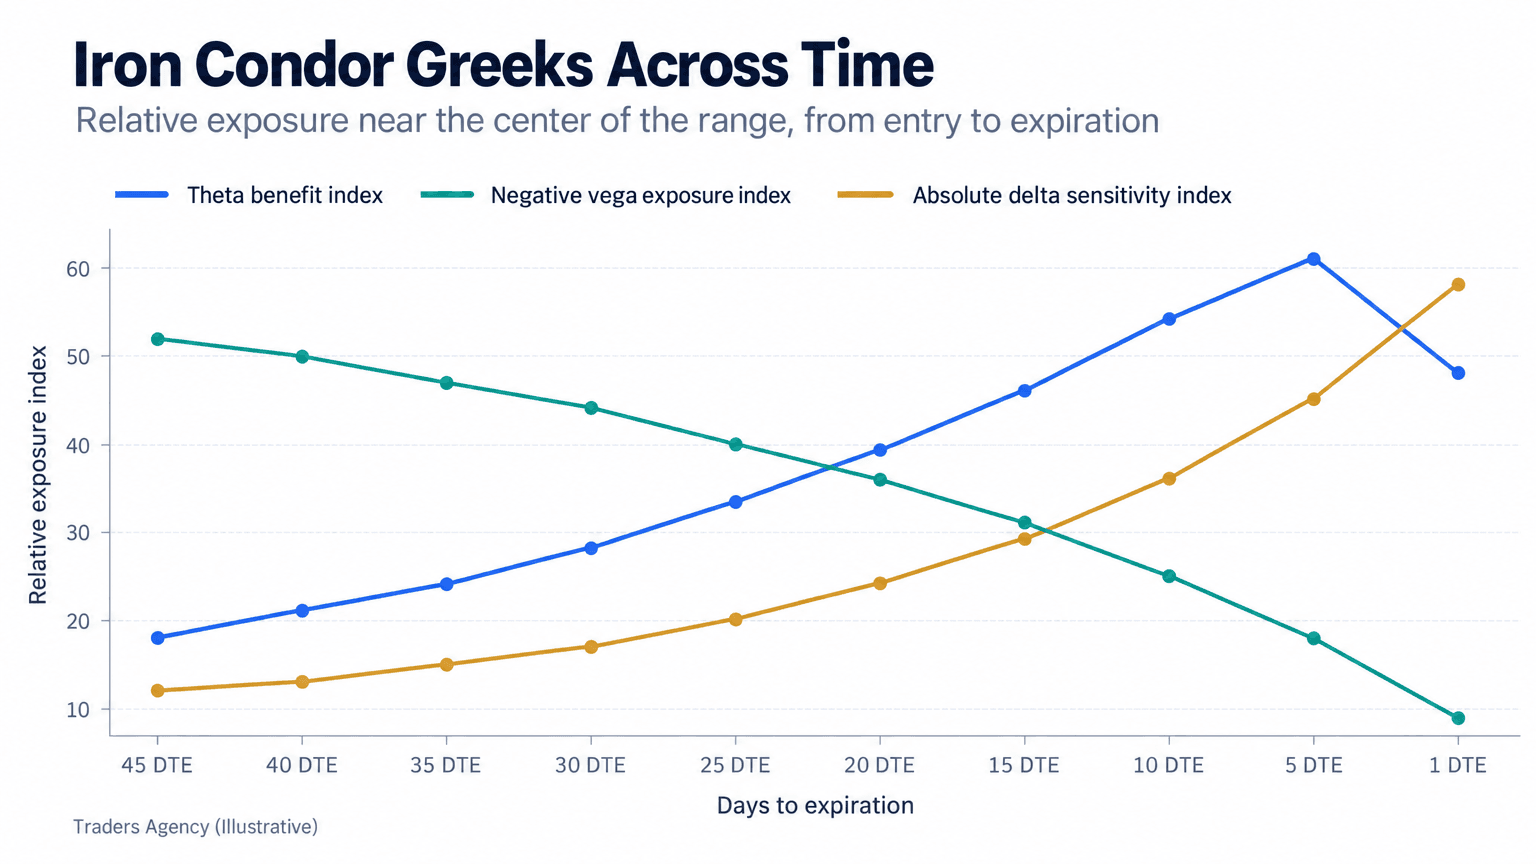
Early in the trade, vega risk dominates because there's more time for volatility shocks to matter. Late in the trade, theta dominates and gamma risk rises sharply, since the options are closer to expiration and price moves have an outsized effect on delta. This is why we close or roll condors around 21 days to expiration, before gamma risk becomes unmanageable.
Is Iron Condor a Good Strategy?
An iron condor can be a good strategy for traders who want defined risk, high probability setups, and consistent premium income in range-bound markets, but it's not a strategy that performs well during sharp directional breakouts or volatility spikes.
Whether an iron condor strategy is profitable over time depends heavily on position sizing and strike discipline, not just on winning a high percentage of trades. A trader can win 80% of their iron condors and still lose money overall if the 20% of losers are sized too large relative to the winners. This is the single most common mistake we see traders make: chasing a high win rate by selling strikes far out of the money, which raises win rate but shrinks the credit collected so each eventual loss is a large multiple of that credit.
Watch Out: A high win rate means nothing if your losers are oversized. Discipline around strike distance and position sizing matters more than the percentage of trades you win.
How Do You Manage Risk in an Iron Condor Position?
Granular risk management is what keeps an iron condor strategy sustainable across many trades rather than profitable on paper and unprofitable in practice.
Position Sizing Guidelines
- Risk no more than 1-2% of account equity on any single iron condor
- Avoid stacking multiple condors on correlated underlyings in the same expiration cycle
- Keep enough buying power in reserve to roll a tested side without forcing a premature close
When to Adjust or Close
- Close or roll when the short strike's delta roughly doubles from its opening value
- Consider closing for a loss once the position reaches 2x the credit received, rather than waiting for max loss
- Take profits systematically at 50% of max profit rather than holding for the full credit, since the risk/reward of the final days rarely justifies the remaining theta
Which Stocks Are Best for Iron Condors?
The best candidates for iron condors are highly liquid, large-cap stocks or index products with tight bid-ask spreads, high open interest across strikes, and elevated but not extreme implied volatility.
We generally prefer broad market index products over single stocks because they carry less binary event risk than individual companies facing earnings or FDA decisions. We avoid building an iron condor strategy around small-cap names with wide option spreads, since poor liquidity can make it difficult to exit or adjust the position cleanly when conditions change.
Related Strategies to the Iron Condor
The iron condor sits within a family of premium-selling strategies, and understanding the alternatives helps you choose the right tool for current conditions.
- Short strangle: similar market view, but undefined risk since there are no protective wings
- Iron butterfly: both short strikes placed at the same price, which collects higher premium but lowers the probability of max profit
- Credit spreads: a single-sided version of the condor, used when you have a directional bias rather than a range-bound view
- Calendar spreads: used to capture time decay differences across expirations rather than a defined price range
Want expert trading insights delivered daily?
Join thousands of traders who rely on Traders Agency for market analysis and trade ideas.
Join Traders AgencyDISCLAIMER: Traders Agency does not offer financial advice. The information provided is for educational purposes only and should not be considered financial advice. Traders Agency is not responsible for any financial losses or consequences resulting from the use of the information provided. Trading carries inherent risks and may not be suitable for all individuals. You are advised to conduct your own research and seek personalized advice before making any investment decisions, recognizing the potential risks and rewards involved.
See more from Traders Agency on Google
Make us a preferred source and our market analysis will appear more prominently in your Google Search, Top Stories, and AI results.
Add to Preferred Sources